
Introduction
In today’s digital world, video calls have become an essential part of both personal and professional life. Whether you are attending an online class, participating in a business meeting, catching up with friends, or connecting with family, your laptop’s built-in camera plays a vital role. Platforms like Zoom, Microsoft Teams, Google Meet, and Skype have made virtual communication easier than ever.
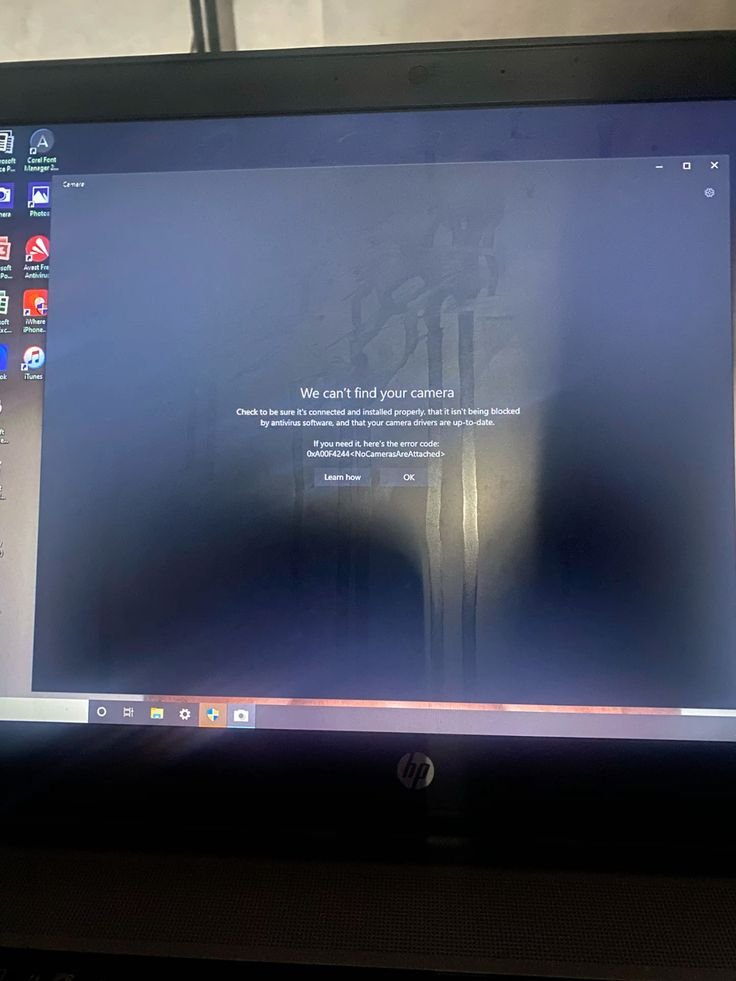
But imagine this—right when your important meeting is about to start, your laptop camera refuses to work. Instead of seeing your face on the screen, you are greeted with a black box, an error message, or nothing at all. Frustrating, right?
This is a common problem that many users face: laptop camera not working during video calls. The issue could be due to simple settings, outdated drivers, or even hardware damage. The good news? Most of these problems can be fixed without needing to buy a new device.
In this article, we will take a comprehensive deep dive into the possible causes, troubleshooting methods, preventive measures, and professional solutions for laptop camera issues during video calls.
By the end, you will have a complete toolkit to diagnose and fix camera problems on your own.
Why Laptop Camera Issues Occur During Video Calls
Before jumping to solutions, it’s important to understand why your laptop camera might not work during video calls. There are multiple possible reasons, ranging from simple misconfigurations to deeper hardware failures. Let’s explore them one by one.
1. Hardware-Related Causes
- Loose or damaged camera connection: In some laptops, especially older ones, the internal connection of the webcam might loosen.
- Faulty webcam module: If your camera has physical damage or internal faults, it may not function properly.
- Camera blocked by privacy shutter: Many modern laptops come with a sliding privacy shutter or physical button that disables the webcam. If this is closed, your camera will not work.
- Dust or obstruction: Sometimes, the lens may simply be dirty or covered.
2. Software or Driver Conflicts
- Outdated camera drivers: Drivers act as a bridge between your hardware and operating system. If your webcam driver is outdated, corrupted, or missing, your laptop may fail to recognize the camera.
- Conflicting applications: If two apps (e.g., Zoom and Skype) try to access the camera at the same time, it can cause issues.
- Windows updates: Certain OS updates may accidentally disable or break camera functionality until fixed.
3. Privacy and Security Settings
- Camera access disabled: Windows, macOS, and even antivirus software often block apps from accessing the camera for privacy reasons.
- Permissions not granted: If you denied permission to Zoom, Teams, or Meet earlier, the camera won’t activate.
4. App-Specific Issues
- Zoom-specific camera problems: Zoom sometimes requires manual camera selection. If the wrong device is chosen, your camera won’t work.
- Teams, Meet, Skype bugs: Different video conferencing apps may have their own glitches or outdated versions that prevent proper camera usage.
5. Internet-Related Factors
- Poor network connection: While rare, sometimes lag or weak internet may cause your video feed to freeze or appear black.
- Bandwidth prioritization: If your internet connection is overloaded, the app may disable video to prioritize audio.
6. Advanced Causes
Antivirus/firewall blocking camera: Security tools may misidentify webcam usage as unsafe and block it.
BIOS/UEFI camera disabled: Some laptops allow you to disable the camera at the BIOS level.
Step-by-Step Troubleshooting Guide
Now that we know the possible causes, let’s get into the practical solutions. These steps are arranged from the simplest to more advanced methods, so you can fix your laptop camera without unnecessary complexity.
1. Basic Quick Fixes
Before diving into deeper technical settings, start with these easy checks:
- Restart your laptop: Sometimes, a simple reboot clears temporary glitches.
- Close other apps: Make sure no other application (like Skype or another video app) is using the camera in the background.
- Check physical shutter or button: If your laptop has a webcam shutter or a keyboard key (like F8 or F10) to enable/disable the camera, ensure it is turned on.
- Clean the lens: Wipe the webcam with a soft microfiber cloth to remove dust or smudges.
2. Check Camera Permissions
Modern operating systems prioritize privacy. If permissions are not granted, your camera won’t work.
On Windows 10/11:
- Go to Settings → Privacy & Security → Camera.
- Toggle Camera Access ON.
- Scroll down and enable camera access for specific apps (Zoom, Teams, etc.).
On macOS:
- Open System Preferences → Security & Privacy → Camera.
- Check the box next to apps that should have access.
- Restart the app to apply changes.
3. Select the Correct Camera in the App
Sometimes the issue is not with the camera itself but with the wrong device being selected inside the app.
- In Zoom: Go to Settings → Video → Camera and choose your laptop’s built-in webcam.
- In Microsoft Teams: Open Settings → Devices → Camera and select the right camera.
- In Google Meet: Click on the three dots → Settings → Video → choose your webcam.
- In Skype: Navigate to Settings → Audio & Video → Camera.
4. Update or Reinstall Webcam Drivers
Drivers are the middlemen between your hardware and OS. If they are outdated or corrupted, your camera won’t function.
On Windows:
- Press Win + X → Device Manager.
- Expand Cameras or Imaging Devices.
- Right-click your webcam → Update Driver.
- If that doesn’t work, uninstall the driver and restart your laptop—Windows will reinstall it automatically.
On macOS:
- macOS generally manages drivers automatically. Ensure you’re running the latest macOS update.
5. Run the Built-in Troubleshooter
Windows comes with handy troubleshooters that can fix common issues.
- Go to Settings → Update & Security → Troubleshoot → Additional troubleshooters.
- Select Camera and run the troubleshooter.
This tool can detect and fix problems like disabled services or missing drivers.
6. Disable Antivirus or Firewall Temporarily
Some antivirus programs (like Avast, Norton, McAfee) block camera access.
- Temporarily disable your antivirus or look in its privacy settings for a “Webcam Shield” feature.
- If the camera works after disabling it, adjust the antivirus settings to allow camera usage.
7. Check Internet Connection
Although the camera might technically work, poor internet can cause video freezes.
- Run a speed test (e.g., Speedtest.net).
- Ensure you have at least 2 Mbps upload speed for stable video calls.
- If bandwidth is low, close unnecessary downloads or connect via Ethernet.
8. System-Level Fixes
For Windows Users:
- Reset Camera App: Go to Settings → Apps → Camera → Advanced Options → Reset.
- Enable Camera in BIOS: Restart laptop → Press BIOS key (F2, F10, Del) → Look for Integrated Camera setting and enable it.
For macOS Users:
- Reset SMC (System Management Controller) and NVRAM to fix hardware detection issues.
- To reset SMC: Shut down → Press Shift + Control + Option + Power for 10 seconds → Restart.
9. Try an External Webcam
If all else fails, connect a USB external webcam. These often come with their own drivers and can bypass internal hardware issues.
Advanced Solutions
If the basic troubleshooting steps didn’t fix your laptop camera, it’s time to try advanced solutions. These methods go deeper into system-level configurations and security settings.
1. Check BIOS/UEFI Settings
Some laptops allow the camera to be disabled at the BIOS/UEFI level for security. If it’s disabled here, no software fix will work.
Steps:
- Restart your laptop and enter BIOS (commonly F2, F10, F12, or Del during startup).
- Look for a menu like Integrated Devices or Security.
- Find Internal Camera/Webcam and ensure it is Enabled.
- Save changes and restart.
2. Roll Back or Reinstall OS Updates
Sometimes, after a Windows Update or macOS Update, the webcam may stop working due to compatibility issues.
- On Windows:
- Go to Settings → Update & Security → View Update History.
- Uninstall the recent update if the issue started after installation.
- On macOS:
- Reinstall the latest macOS version using Recovery Mode if you suspect a corrupted system update.
3. Disable Conflicting Apps or Services
Some background apps may interfere with the webcam. Examples include virtual camera software (like OBS Studio, ManyCam, Snap Camera).
- Open Task Manager (Ctrl + Shift + Esc) on Windows.
- End tasks that might be accessing the camera.
- On macOS, open Activity Monitor and quit conflicting apps.
4. Reset or Reinstall the Operating System
If nothing else works, your OS might have a deeper corruption issue.
- Windows Users:
- Use Reset this PC under Settings → Recovery.
- Choose Keep my files to reinstall Windows while keeping your documents.
- Mac Users:
- Boot into macOS Recovery (Command + R).
- Select Reinstall macOS.
This usually restores full camera functionality unless it’s a hardware fault.
5. Use External Diagnostic Tools
If you suspect hardware failure:
- Use free online tools like Webcam Test (webcamtests.com) to check if your webcam is detected.
- If the site doesn’t detect your camera, it’s likely a hardware problem.
Preventive Measures
Once your laptop camera is working again, you’ll want to avoid future problems. Here are some best practices:
1. Keep Drivers and Software Updated
- Regularly update your OS, webcam drivers, and video calling apps.
- Outdated versions are the #1 cause of compatibility problems.
2. Avoid Installing Multiple Camera Apps
- Having too many apps (OBS, Snap Camera, etc.) can create conflicts.
- Stick to one or two essential video conferencing apps.
3. Protect Against Malware
- Malware can hijack your camera or disable it.
- Install a trusted antivirus and run periodic scans.
4. Handle Your Laptop Carefully
- Avoid dropping or pressing the top bezel of your laptop.
- Internal webcam modules are delicate and can easily disconnect.
5. Check Privacy Settings Regularly
- After system updates, OS may reset privacy permissions.
- Double-check that apps still have camera access.
When to Seek Professional Help
Sometimes, DIY fixes aren’t enough. Seek professional help if:
- Hardware Damage: Your webcam shows physical cracks, loose wiring, or no detection at all.
- Camera Not Detected Anywhere: Neither the OS nor external tools can recognize the camera.
- Frequent Freezing or Flickering: This may indicate an internal wiring issue.
- Post-Liquid Damage: If water or coffee spilled on your laptop, internal parts may be damaged.
In such cases, visit an authorized service center or a certified repair technician. They can replace or reattach the camera module.
Frequently Asked Questions (FAQs)
1. Why is my laptop camera showing a black screen during video calls?
This usually happens if another app is already using the camera, or if the correct camera is not selected in your video calling software. Also, check if the privacy shutter is closed.
2. My laptop says “No camera detected.” What should I do?
If your OS cannot detect the camera, it may be due to:
- Disabled camera in BIOS/UEFI.
- Corrupted or missing drivers.
- A hardware failure in the camera module.
Try reinstalling drivers first. If that fails, professional repair may be needed.
3. Can antivirus software block my webcam?
Yes. Some antivirus tools (e.g., Avast Webcam Shield, Norton Privacy settings) block webcam access by default. Check your antivirus settings and whitelist video conferencing apps.
4. Why does my camera work on one app but not another?
This happens when app-specific permissions are disabled. For example, Zoom may have access while Teams does not. Always check camera permissions per app in your OS settings.
5. Do I need a new laptop if my camera stops working?
Not necessarily. In most cases, software fixes, driver updates, or a cheap external USB webcam can solve the problem. Only in cases of severe hardware damage should you consider replacement.
6. How do I improve the quality of my laptop camera?
- Ensure good lighting.
- Clean the camera lens.
- Use HD settings in your video app.
- If your built-in camera is too low quality, invest in an external HD webcam.
7. My camera keeps freezing mid-call. Is this a camera problem?
Not always. Freezing can be caused by low internet bandwidth, background apps overloading the system, or graphics driver issues. Close unnecessary apps and test your internet speed.
8. How do I test if my laptop camera is working outside of video apps?
- On Windows: Open the Camera app from the Start Menu.
- On macOS: Use Photo Booth or Facetime.
- Online: Visit webcamtests.com.
Conclusion
In today’s connected world, a working laptop camera is no longer a luxury—it’s a necessity. From business meetings and remote learning to personal catch-ups, video calls have become the backbone of communication.
When your laptop camera doesn’t work during video calls, it can cause stress, embarrassment, or even missed opportunities. Fortunately, as we’ve explored in this guide, most issues are not permanent and can be solved through a systematic approach:
- Start with basic checks (restart, permissions, lens cleaning).
- Move on to driver updates and app settings.
- Try advanced solutions like BIOS checks or disabling antivirus interference.
- Apply preventive measures to keep your camera working smoothly.
- If all else fails, consider professional repair or an external webcam.
By following this step-by-step troubleshooting process, you’ll be able to identify and fix nearly any laptop camera issue during video calls. And even if your built-in webcam fails permanently, affordable external alternatives ensure you’ll never be cut off from the virtual world.
So the next time your video call is about to begin, you can sit back, relax, and smile—because your laptop camera will be ready to capture every moment.